
Kubenetes Basic Setup
GKE in Production - Part 1
This tutorial is part of a series I am creating on creating, running and managing Kubernetes on GCP the way I do in my day job.
Note: There may be some things I have skimmed over, if so or you see a glaring hole in my configuration, please drop me a line via the contact page linked at the top of the site.
What we will build
In this first tutorial, we will be building a standard GKE cluster on Google Cloud Platform and deploying the hello world container to confirm everything is working.
What you will need
You will need:
- An active GCP account with either a credit card linked, or Google credits.
- Some ability to use a command line. (I will show some steps in the UI where there are more options to see.)
- Willingness to learn k8s, helm, let’s encrypt and nginx configurations.
Initial Setup
There are two paths you can take here:
- Use Google Cloud Shell as your terminal whilst interacting with GKE;
- Install the GCP SDK bundle on your machine. <- I am doing this.
Project setup
Firstly, ensure you have an active GCP account. Login to the GCP console at https://console.cloud.google.com: Once logged in:
- Create a project for your GKE cluster. If you are creating a new GCP account, this will be done as part of the setup process.
- Ensure you have billing enabled.
- Enable the required APIs we will use.
Enable Billing
Sing into Cloud Console, then select the correct project from the Project dropdown at the top of the Cloud Console page. Open the navigation menu (three horizontal bars at the top left) and then select Billing. If billing is not enabled, a pop-up window will open saying that the ‘project is not linked to a billing account’.
To fix this, select “Link a billing account” and follow the prompts.
Enable Required APIs
Sign into Cloud Console, then open the navigation menu and select APIs & Services, then Library. Once in Library, in the search box we will need to search for and enable two API’s.
Artifact Registry API
Kubernetes Engine API
Once you have found them, click into each and then select the “Enable” button.
GCP SDK Installation
Head over to the SDK docs site https://cloud.google.com/sdk/docs/install and download the SDK for your OS, following the install instructions.
For me, that looks like this: (Ubuntu 20.04 LTS)
- Download the SDK:
curl -O https://dl.google.com/dl/cloudsdk/channels/rapid/downloads/google-cloud-sdk-367.0.0-linux-x86_64.tar.gz - Extract the archive:
tar zxvf google-cloud-sdk-367.0.0-linux-x86.tar.gz - Run the installer:
cd google-cloud-sdkand then./install.sh
You will be asked a few questions:
- Improve Google Cloud SDK: I answer Yes here, but the default is No.
- Modify profile to update your $PATH and enable shell command completion: Always opt for Yes unless you have a good reason.
- Location of my .bashrc: The default is normally correct.
Restart your terminal and you should be able to get the path to the gcloud command with which gcloud if you are running Linux.
GCloud command initialisation
Now run gcloud init to initialise the application with your credentials.
You will be asked to allow the application to access your Google details. Select ‘Allow’.
Then the application will ask what project to use if you have multiple. Select the one that you wish to use. You can change this later.
When asked if you want to setup the default computer region, select Yes and select your desired region.
Lastly, run gcloud components install kubectl so we have the latest available kubectl command.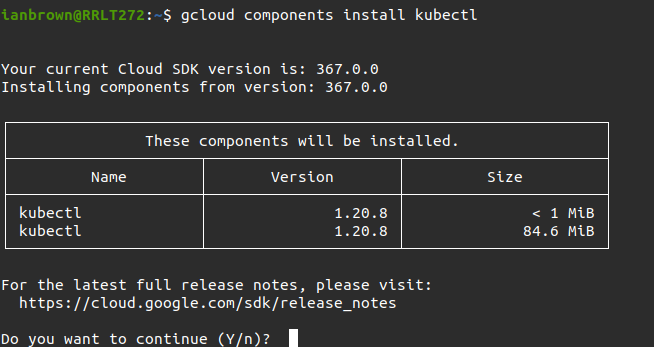
And now you are done setting up the GCP SDK.
Creating your first GKE cluster
Initial Checks
First, ensure you have your desired project and compute zone & region set:
Display the project:
gcloud config get-value project
Display the compute zone:
gcloud config get-value compute/zone
Display the compute region:
gcloud config get-value compute/region
Create a GKE Cluster
The Kubernetes cluster consists of at least one control plane machine as well as one or more worker machines called nodes. In GKE, a node is a compute engine VM instance and is charged as such. The control plane machine is hosted by Google and not something you need to pay for.
The cluster we will create will be called ‘hello-cluster’ in the console.
Run the below command to create the cluster:
gcloud container clusters create hello-cluster --num-nodes=1
This command will take a while to complete, so let’s break it down while we wait:
gcloud container clusters is the endpoint we are running the command against.create tells GKE that we want to create a cluster.hello-cluster is the name of the cluster we are creating.--num-nodes=1 is a switch that tells GKE we only want a single node.
You can also add switches like:
--machine-type=n1-standard-4 to create nodes that are of type n1-standard-4.--tags=[comma separated list of tags] to assign tags to each node.--enable-autoprovisioning-autoupgrade to automatically provision new nodes and upgrade existing nodes.--enable-autoprovisioning-autorepair to automatically provision new nodes and repair failed nodes.
Another switch of note is --enable-cloud-monitoring which, as the switch would suggest, enables monitoring.
If you want the cluster to be in a different region or zone, you can also use the --region=<region> and --zone=<zone> switches.
Deploy the Hello World container
Now that you have a working GKE cluster, it is time to test it and ensure it is working as desired. To do this, we are going to deploy the hello-world app which shows a simple Hello World page when you hit the endpoint.
Create the deployment
To run the app, simply run the below command in your terminal or cloud shell:
kubectl create deployment hello-world --image=us-docker.pkg.dev/google-samples/containers/gke/hello-app:1.0
Let’s break this monster of a command down:
kubectl create deployment simply tells GKE that we want to create a new deployment.--image=us-docker.pkg.dev/google-samples/containers/gke/hello-app defines the image we want to use. In this instance, we are using the hello-app image from GCP’s samples registry.:1.0 at the end tells GKE that we want to use tag 1.0 of the app. (You can have many tags for the same image in docker registries.)
Expose the deployment
Once the application is deployed, you will need to expose it to the internet so we can access it. We do this by creating a Service which is a resource that exposes the application to external traffic.
Run the following command:
kubectl expose deployment hello-world --type LoadBalancer --port 80 --target-port 8080
Again, we will break this down:
kubectl expose deployment simply tells GKE that we want to expose the deployment we specify.hello-world is the name of the deployment we want to expose.--type LoadBalancer tells GKE to create a Compute Engine load balancer for the container.--port 80 is the external port we are opening on the internet side.--target-port 8080 is the internal port on the container we will connect the traffic to.
Check everything has deployed and is working
We can inspect running pods using the following command:
kubectl get pods
You should see a single hello-world pod running on the cluster.Check the service is running:
kubectl get service hello-world
From the output of this command, take note of theEXTERNAL-IPcolumn as we will be using that next.
You may see “<pending>” in the EXTERNAL-IP column. Give the load balancer another minute and run the command again until you see an IP address.Open the application to check it is working in your web browser:
http://EXTERNAL_IP
If everything completed successfully, you will see something like the below screenshot.
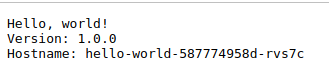
On this page:
Version is the version we deployed. (Remember the :1.0 in the container deployment command?)
Hostname is the actual pods hostname.
Other notes
DNS
GKE runs an internal DNS resolver in the cluster.
Pods are resolveable using <hostname>.<namespace>.svc.cluster.local
In our case, this equates to hello-world-587774958d-rvs7c.default.svc.cluster.local.
This means if you have multiple pods in a cluster, you can rely on DNS to resolve between the pods instead of having to know the pod IP.
You can even set your own hostname when deploying new pods on either the command line or in yaml/json.