

Introduction to GCVE
What is GCVE?
Google Cloud VMware Engine, or GCVE, is a fully managed VMware hypervisor and associated management and networking components, (vSphere, NSX-T, vSAN and HCX) built on top of Google’s highly performant and scalable infrastructure with fully redundant and dedicated 100Gbps networking that provides 99.99% availability.
The solution is integrated into Google Cloud Platform, so businesses benefit from having full access to GCP services, native VPC networking, Cloud VPN or Interconnect as well as all the normal security features you expect from GCP.
GCVE is designed to assist businesses attempting to migrate to Cloud by providing a more simple “lift and shift” from on-premise VMware.
GCVE Reference Architecture
Since GCVE is a VMware certified product, the below reference architecture has been verified by VMware to work.
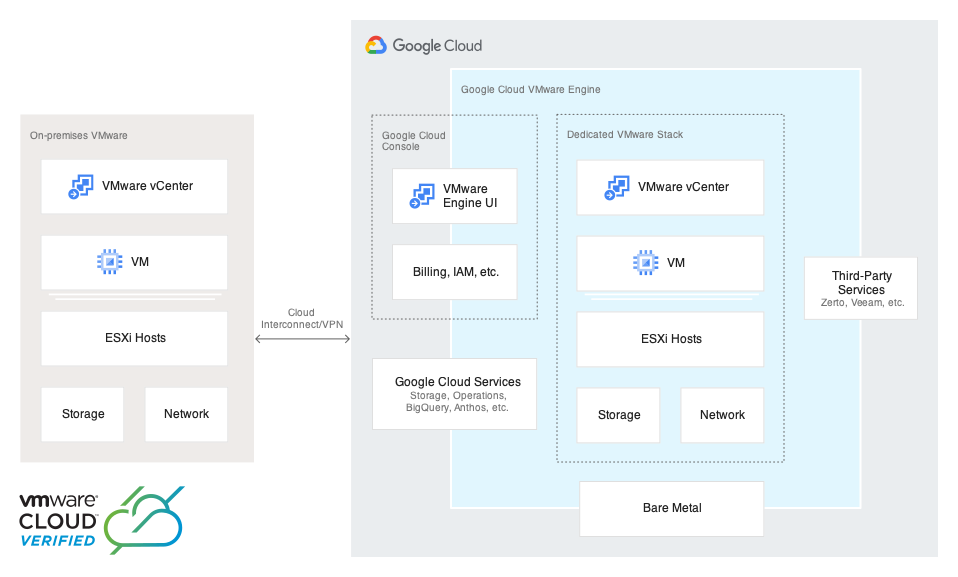
Credit to Google for this diagram.
Note that the servers used for GCVE are not the standard Google bare metal devices. These are Dell Poweredge R640 enterprise grade servers with the following specs at the time of writing:
- 2 x Intel Xeon Gold 6240 @ 2.60GHz (18 cores, 36 logical processors per socket)
- 768GB of RAM
- 19TB of NVMe
- 4 x 100Gbps Network (50Gbps reserved for vSAN)
Pre-requisites
There are a few things that are required prior to building your first GCVE cluster.
Account
Firstly, ensure that billing is enabled for your project.
If you are unsure how to do that, click here to view the docs: https://cloud.google.com/billing/docs/how-to/modify-project
Now, enable the GCVE API for your project by clicking here: https://console.cloud.google.com/apis/library/vmwareengine.googleapis.com
Networking
To connect a VPC network to a GCVE private cloud, you must setup private services access.
This is also required for connecting to your on-premise VMware environment.
https://cloud.google.com/vmware-engine/docs/networking/howto-setup-private-service-access
You will also need to create a Cloud VPN or Cloud Interconnect. Both links are below to the documentation on those:
- Cloud VPN: https://cloud.google.com/network-connectivity/docs/vpn
- Cloud Interconnect: https://cloud.google.com/network-connectivity/docs/interconnect
Additionally, you will need a network range that does not overlap an existing VPC network range or on-premise range specifically for GCVE.
Note that this range is only used for GCVE networking and does NOT need to be used for workload networking in NSX-T.
The minimum allocation is a /24 which will allow for a maximum of 26 nodes. A maximum allocation of /21 will allow for a maximum of 220 nodes.
However, currently the maximum number of nodes in a single private cloud is 64.
You will also need another CIDR range for HCX management. This must be a /27 or higher.
The following ranges are NOT to be used anywhere wihtin your environment as GCVE uses them for various functions:
- 127.0.0.0/8
- 224.0.0.0/4
- 0.0.0.0/8
- 169.254.0.0/16
- 198.18.0.0/15
- 240.0.0.0/4
DNS
If you need global address resolution using Cloud DNS, you will need to enable the Cloud DNS API. This step MUST be completed before creating your private cloud.
Using Cloud DNS, you will be able to create forwarder zones in private DNS to resolve your internal domain names as well as external DNS zones in Cloud DNS.
Creating your first private cloud
This process can take anywhere from 30 to 60 minutes to create the private cloud.
- Open your browser to the GCP console and navigate to the VMware Engine portal.
- On the GCVE homepage, click ‘Create a private cloud’. Select your hardware location and hardware node type.
- Select the number of nodes for your private cloud.
- For production private clouds, you must use at least 3 nodes to be covered by the SLA.
- For testing private clouds, you can select a single node, however be aware that GCVE deletes single node private clouds after 60 days.
- Enter the CIDR range you identified previsouly for the VMware management network.
- Enter the CIDR range you identified previously for HCX Management network.
- Click ‘Review & Create’ and ensure all settings are correct.
- Click Create to begin creating the private cloud.
GCVE will now deploy to a domain that is only accessible within the GCP ecosystem.
Connecting to your private cloud
The simplest way to connect to GCVE is using a point to site VPN connection in GCVE.
Ensure you have the OpenVPN client installed and then follow these steps to get a tunnel setup:
- Open the VMware Engine portal
- Navigate to Network on the left menu, then click the VPN Gateways tab at the top of the page.
- Configure the following settings:
- VPN Gateway type is set to Point-to-site VPN,
- Select the location of your private cloud,
- Give the VPN a name,
- Select a client subnet with a /24.
- Click Next
- Select the users you want to allow access to the VPN. (Or flip the switch to automatically add all users.)
- Click Next
- Flip the switch for ‘Add management subnets of Private Clouds’
- Flip the switch for ‘Add user-defined subnets’
- Click Next and review your settings.
- Click Submit to create the VPN.
Once the VPN is created in GCVE, you can then click into it and select the ‘Download my VPN configuration’ link to download the OpenVPN file.
Public IP & Gateway service
GCVE has two special services to be aware of. These are the Internet Gateway service and the Public IP service.
These two services were specially built by GCP for the GCVE product to address internet access and public IP addresses.
Internet Gateway
Workload VMs access the internet using the Internet Gateway service.
The internet gateway service supports:
- Up to 2Gbps throughput over 128k concurrent connections for each region
- TCP, UDP and ICMP protocols
The service does not support application level gateway (ALG) functionality.
Note: All traffic exiting your private cloud will use the Internet Gateway service unless you configure it otherwise. This service changes its public IP roughly daily.
Public IP Service
The public IP service allows you to expose your VMs to the internet using a 1:1 NAT direct to the VM, or a load balancer running within NSX-T.
A public IP address resource also provides:
- DDoS attack prevention. This protection is automatically enabled for the IP address by GCP.
- Always on traffic monitoring and real-time mitigation of common network-level attacks.
- Protection and mitigation of attacks across the entire scale of the global network.
All public IP addresses need to be located in the region of your private cloud and allocated to the private cloud in which you are using them.
A single address can only be assigned to a single private IP address.
You can have a maximum of 100 public IP addresses per VPC network connected to GCVE.
Terraform
As at the time of this writing, terraform was not available for GCVE. There is however terraform modules for NSX-T which we will get into in a separate article that I will link here later.
The latest documentation for the terraform NSX-T provider is here: https://registry.terraform.io/providers/vmware/nsxt/latest/docs
Summary
There are a heap of other toptics that I haven’t covered in this topic, so head over to the documentation page to see more: https://cloud.google.com/vmware-engine/docs/overview